← All recipes
flameChickenAmericanWeekend project
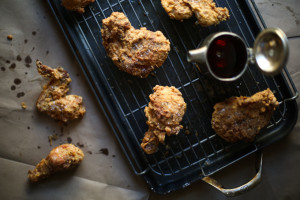
Maple-Brined Smoked Fried Chicken
Prep1 hour
Cook4 hours
Serves8 pieces
Ingredients
- 1 gallon (16 cups) of warm water
- 1 cup of kosher salt
- ½ cup of maple syrup
- 1 chicken, cut into 8 pieces (legs, thighs, breasts, and wings), skin left on
- 4-6 cups of canola oil, or enough for frying
- 1 cup of buttermilk
- 2-3 eggs
- 2½ cups all-purpose flour
- 1 teaspoon of sea salt
- 1 teaspoon of freshly cracked pepper
- ½ teaspoon of smoked paprika
- ½ teaspoon of cayenne pepper
Instructions
- 1. Dissolve the kosher salt and syrup into the warm water. Make sure you are using kosher salt and not regular table or sea salt—the regular and sea salt are far too harsh and will make the chicken overly salty. Add the chicken pieces and refrigerate for 2-3 hours.
- 2. Set your smoker to smoke and once you notice a flame has established, place the chicken in the smoker, close the lid, and smoke for 30-60 minutes, or until you notice the chicken start to take on a slightly yellow color on the edges (see photo above of the chicken sitting in the bowl for reference). Your goal here is to infuse smokiness while cooking the chicken as little as possible, so make sure to keep the temperature on your smoker as low as possible. I kept mine between 140 degrees F and 160 degrees F for 60 minutes.
- 3. In a large frying pan or a medium sized dutch oven, heat oil over medium-high heat.
- 4. Whisk together the buttermilk and the eggs in a medium sized bowl. Set aside. In another medium sized bowl, mix together the flour, sea salt, cracked pepper, smoked paprika, and cayenne pepper. Dip a piece of the chicken into the buttermilk and turn to coat. Transfer it immediately to the flour and turn to coat. Make sure all of the chicken is coated with flour by pressing it into the chicken. Gently shake off the excess flour before frying.
- 5. Once you notice the oil begin to shimmer on the top, slowly dip a piece of the battered chicken into the oil to test for temperature. (I use a wing as my tester piece.) If it turns golden within less than 30 seconds, the oil is too hot; if it doesn’t sizzle at all, the oil is not hot enough. Adjust temperature as necessary until it reaches the temperature where the chicken sizzles and bubbles when it hits the oil, but doesn’t turn golden immediately.
- 6. Cook chicken pieces until they are golden and cooked all the way through, about 4-5 minutes per piece, rotating the pieces once or twice as they cook to make sure they have an even goldenness. Again, if you notice them turning golden much faster than this, reduce the heat and wait for the oil to cool down before proceeding so that you don’t end up with raw chicken on the inside.
- 7. Anytime it comes to frying, it’s important to make sure you’re not overcrowding the pieces in the fryer as it will reduce the temperature of your oil too quickly. I was using a 7-quart dutch oven to fry in and never had more than 2 pieces in the oil at a time.
- 8. Once chicken pieces are fully cooked and golden, remove them from the oil and transfer them to a wire rack or paper towels to drain. Season with a pinch of sea salt, if desired.
Originally published at Chocolateandmarrow.com. Reproduced for personal collection.